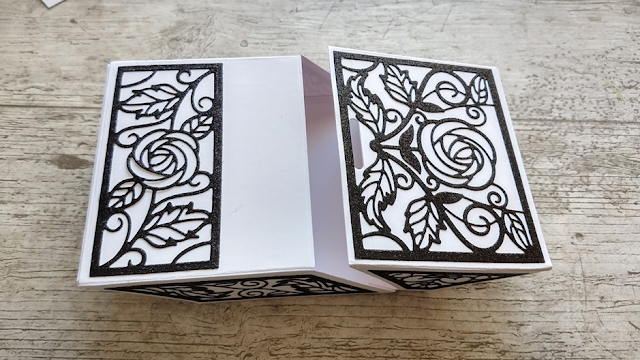
This is the Beautiful Bow Display Box Die Set from Tonic Studios
It can be used to make a pretty little box which is hinged at the back and closes with a “strap” which fits behind the beautiful bow.
The full instructions are also found inside the packaging but I show you how to assemble and decorate the box in this blog post.
This is the box which I show you how
to make in this Step by Step blog post
You can see how to make the other box and the card in my video here -
To make this you will need the
following
Beautiful Bow Display Box Die Set
White Smooth Card
Craft Perfect Black Sapphire Glitter
Card
Nuvo Deluxe Adhesive
How to make it
You can cut out all the pieces which
are shown in the instructions before you start or you can cut them as you
follow along with the steps which I have written here.
4. Turn over
and glue the panels together as shown.
5. Die cut
white Side Panel D and the decorative panel using both the detail and outline
dies. Glue these together. Burnish all score lines as you go along.
6. Die cut a
white hinge, turn over and glue the top panel, side panel d and hinge together
in the order shown in the photo.
7. Glue
together to form the base for the box.
8. Die cut
and decorate Side panel B and Side Panel C as shown.
9. Place the 2 other Top Panels as shown, glue
the Side Panels onto the glue tabs. Glue a white Side Panel D onto the back of
this and then add the 2nd Top Panel to form the box.
10. Die cut
a small decorative (the size which fits Side Panel D) and glue this to the box
as shown. Attach both side of the box by
gluing the hinge to the inside of the larger side on the left.
11. This is
how it should look when both sides are attached.
12. To form
the inside box, die cut 2 Inner Box Panels. Glue the bases together with all
the glue tabs facing each other, then fold up the sides and glue the corners
together.
13. Die cut
the Pull Tab and glue centrally underneath the inner box.
14. Place
the inner box inside the outer box and feed the Pull Tab through the slit on
the opposite side.
15. To make
the bow, die cut the pieces shown.
17. Centre
the Slot over the Pull Tab and glue in place, making sure you only add glue on
the side tabs.
18. Glue the
Bow to the raised centre part of the Slot.


No comments:
Post a Comment
Thanks so much for taking the time to leave a comment, it's lovely to hear from you. Ruth