Tuesday 30 March 2021

Tonic Studios Mid week Deals (affiliate)

The Mid week deals are available now from Tonic Studios 🛒UK - https://bit.ly/3u4ueUY 🛒USA - https://bit.ly/2O5q6Vo (affiliate links) The deals this week are UK - Mystery Die Bundle rrp £100 on sale at £25.00! Goodie Bag rrp £83.96 on sale at £22.00! Sentiment Bundle rrp £25.96 on sale at £10.38 Special Occasions Sentiments bundle rrp £38.97 on sale at £15.59 USA - Mystery Die Deal rrp $100 on sale at $25.00! Goodie Bag rrp 86.93 on sale at $22.00! Sentiment Bundle rrp$31.96 on sale at $12.78 Special Occasions Sentiments Bundle rrp $41.97 on sale at $12.59


Monday 29 March 2021

Introducing my new website - Ruth Hamilton Design


 Hello! I'm so happy to introduce you to my new website, https://ruthhamiltondesign.com/

where I will be selling downloadable digital images which you can print and colour for your own craft projects such as card, scrapbook pages and journals etc. My son has worked really hard to build the website and bring this to fruition for me. I have drawn lots of images, mostly flowers, coloured them and made samples with them and at last I'm able to show them to you! I will be posting lots of tutorials on how to colour the images eg with alcohol markers, watercolours etc but most of all I'd really just love you to enjoy the process and relax! Thanks so much for watching this video. I'd love you to visit the website (lots of new images will be added soon) and also to subscribe to my channel so that you can see more of my videos. Keep safe and well :)


Friday 26 March 2021

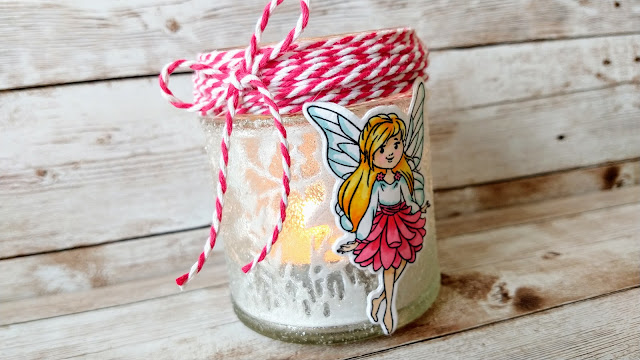
Making a Fairy Tea Light Holder with Stamp Club 7 - Tonic Studios (affiliate)


The little fairy stamps and dies in Stamp Club 7 ("I Love You Fairy Much") are not only gorgeous on cards but can also be used to decorate little jars for putting battery powered tea lights inside :)

These are my affiliate links which will take you straight to where you can buy

(Disclosure - http://apassionforcards.blogspot.com/p/how-it-works.html)

To make this you will need the following (all from Tonic Studios)
Stamp Club 7
Nuvo Alcohol Markers
Nuvo Glitter Accents (Fresh Snowfall)
Nuvo Deluxe Adhesive
Craft Perfect Bright White Card
Sponge Dauber
Black ink

Jar
twine
tea light


Lets' get started!

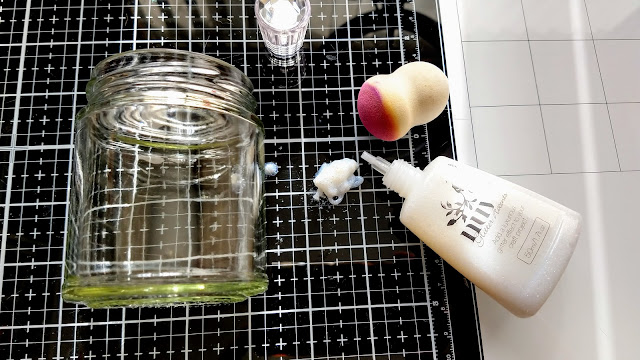
1. Squeeze some Glitter Accents out onto a non porous surface (your glass mat is perfect for this!)


2. Sponge the Glitter Accents all around the outside of the jar and leave to dry.


3. Stamp out the fairy onto white card.


4. Colour the face with Apricot Blush and Delicate Rose. Colour the hair with Lemon Drops, Indian Saffron and Butternut Squash.


5. Colour the skirt with Pink Lady and add Aqua Spray to the top and wings.


6. Die cut.


7. Gently shape the fairy with a bone folder or gently press it around the outside of a narrow bottle.


8. Glue to the outside of the jar with the Deluxe Adhesive.


9. Die cut some grass from along the bottom of the patterned rectangular die. Die cut a long leaf. Repeat so that you have 2 of each (or as many as you need to go around the jar you are using)


10. Shape the grass and leaves with the bone folder.


11. Glue to the inside of the jar.


12. Repeat with the leaves at the top of the die.


13. Glue these around the inside of the jar at the top.


14. Add some glue around the top of the jar and twist several layers of twine around it. Secure at the back with more glue (tacky glue or from a hot glue gun is fine)/. Add a twine bow at one side :). Pop a battery tea light inside and enjoy :)


I've used a different fairy stamp from the set on this little jar and you can see my video on how to make the card here- 


Tuesday 23 March 2021

Introducing the Sweet sorbet Trend from Tonic Studios (affiliate)


Sweet Sorbet is the first new trend of 2021 from Tonic Studios and it's simply stunning!

Here are my affiliate links to the products if you want to check them out -


In my video I show you most of the items in the trend and follow up by making two very different cards from scratch.
(If you enjoy the video, don't forget to subscribe to my channel! Thanks very much :) )

I have also used Craft Perfect Ivory Card along with the following items (all from Tonic Studios....
Just Because Floral Scribble die set Showcase -
Tim Holtz Deckle Edge Trimmer
Perfect Petals Peonies die set
Designer's Choice 17 Home Sweet Home die set
Floral Boutique Collection die set


Enjoy!

Thursday 18 March 2021

Tonic Studios Showcase 6 - Floral Boutique (affiliate)


This is just the prettiest die set and I have picked lovely pastel shades to create a card and 3 different bookmarks with it. You can buy Showcase 6 - Floral Boutique from the Tonic Studios websites now. These are my affiliate links which will take you straight to it -

🛒UK - https://bit.ly/3txvPSR 🛒USA - https://bit.ly/3eQuum3


In my video I show what is in the set, how to use the dies to make a card and also how to make 3 differently shaped bookmarks. As a bonus, I show you how to make a cute little quilled paper bead using one of the dies from the set with the new Quilling Tool from Tonic.

 If you enjoy my video please subscribe to my channel to come back and see more :)


The card I used is Craft Perfect Speciality card - Powder Blue Lace and Sage Roses.

Thanks so much for watching! Keep safe and well :)


Friday 12 March 2021

On Your Special Day - Tonic Studios (affiliate) with video

Hello :) I've just posted a video on my YouTube channel showing how I made this layered card with the Tonic Studios Special Occasion Layer Frame Anniversary die set. You can see it here -

Here are my affiliate links to most of the things I used in the video -

Tangerine 🛒UK - https://bit.ly/3sPYzpA 🛒USA - https://bit.ly/30girpy Special Occasion Layer Frame Anniversary die set UK - https://bit.ly/3tb8CG2 USA - https://bit.ly/2OQJLIz Always and Forever die set UK - https://bit.ly/2OrjXmv USA - https://bit.ly/3rD6tT8 I also used Craft Perfect card - Mauve Purple, Amethyst Purple and Silver Silk Speciality card : Nuvo Deluxe adhesive and Ivory Seashell Nuvo Drops.


Thursday 11 March 2021

Tonic Studios Designer's Choice No. 17 - Home Sweet Home (affiliate)


Just when I thought these Tonic die sets couldn't get any cuter...along comes this little beauty!
You can see my video on this die set on my YouTube channel here - 

If you'd like to have a look at this set on the Tonic Studios websites please feel free to use my affiliate links below - 

First of all let's have a look at the dies in the set!
You get so many dies in these sets that I usually suggest in my videos, that you take a quick photo with your phone or whatever, before you start so that you will be able to fit them all back on the sheet again!


In this blog post I will be making the little house in the centre of the top photo.

To make it you will need the following - (all from Tonic Studios)
Designer's Choice Die Set No. 17 "Home Sweet Home"
Craft Perfect A4 Bright White 300gsm Smooth Card
Craft Perfect Texture Weave Card - Pewter Grey and Fern Green
Craft Perfect 
Craft Perfect Grey Board
Craft Perfect double sided adhesive tape
Nuvo Deluxe Adhesive
Nuvo Crystal Drops - Buttermilk and Carnation Pink

How to make it - 

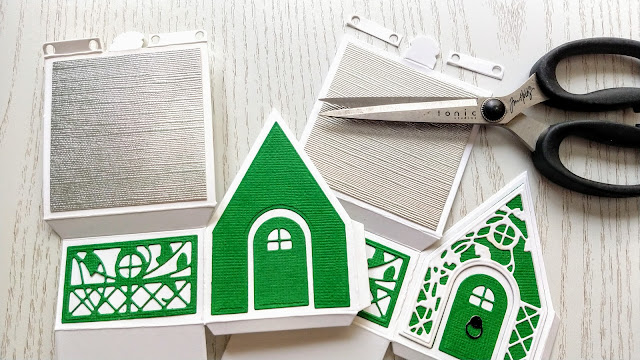
1. Die cut 2 of the main house shape panels from white card and reinforce the score lines as shown.


2. Die cut 2 of the plain arch shapes from green card.


3. Using both dies shown, cut out one decorative arch from white card.


4. Glue the green panels to the front and back of the little house.


5. Using the 2 dies shown die cut the decorative side panels from green card and glue to the sides of the house.


6. Die cut 2 green doors and a little set of extras show. Glue the doors in place and glue the knocker to the front door.


7. Cut 2 squares of Silver Silk card measuring 6cm x 6cm and attach these to the roof panels with double sided tape.


8. Snip off the two tabs at the top of the roof on the front panel. Die cut 2 grey "tile" pieces and glue one across the top of the roof on the back panel. Only add glue to the outer edges of the one for the front panel before gluing in place.


9. Die cut another 4 grey tile panels and fold back along the top edge where the debossed line ends.


10. Glue these pieces to the roof panels as shown and snip off the top corners. Add hi tack tape to the tabs around the front and back of the house.


11. Glue the bases of the house panels together.


12. Connect the other tabs with the hi tack tape.


13. Cut a 9cm square of grey board, a 9cm square of green card and a 9cm x 2.5cm strip of grey card.


14. Glue the green card to the grey board and the grey strip down the centre.


15. Glue the house to the board and die cut the little pebble pieces from white card, then glue one in front of each door.


16. Add the Crystal Drops around the doors and "garden".


                                                                            Front

Back