Monday 29 February 2016

Sew Pretty Pinhole card tutorial - Tonic Studios

Tonic Studios have recently released sets of dies which can create beautiful pinhole effects in cards. 
The sets can be used together and also look great when they are combined with the Layering die sets.

I've created an aperture card using a combination of dies and you can see below how I made it.

You will need:
white card
double sided tape
gems
twine
die cutting machine

How to make it:

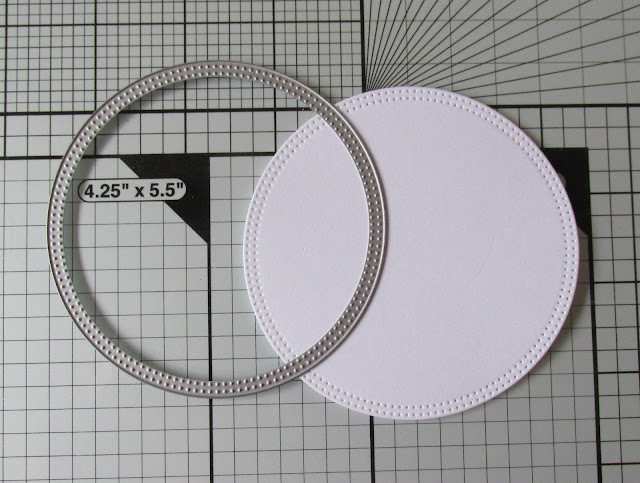
1. Create a 14.5cm x 14.5cm scalloped card using the Harrop die set. Place  Pinhole Circle die (3rd from  the outside) on top of the card front and pass through the die cutting machine.


2. This die does not cut an aperture  - it creates the pinhole effect.


3. Place the largest die from the "Have a Beautiful Day" set in the centre of the card front and cut  - through the card front only. Set the die cut aside to use on the inside of the card.


 4. Cut a piece of white card measuring 13.5cm x 6cm. Score at 1cm 3cm and 5cm. Fold as shown
 to form a gusset.


 5. Attach the gusset to the bottom of the inside back of the card with double sided tape. Cut a piece of patterned paper to measure 13cm x 13.5cm and attach over the back covering where the gusset is attached.


 6. Place the die cut from stage 3 inside the card and glue in the centre  - directly inside the aperture.


 7. Use a circle layering die to cut a spotty circle which fits inside as shown. TIP - I have numbered the backs of my circle dies from smallest to largest with a permanent marker. I have used no. 8 here.


 8. Cut out a white circle one size bigger.


 9. Use the pinhole die for the Beautiful Day set on the circle you have just cut out.


10. Cut the pattern into the white circle using the inner patterned die from t he same set. Cut out the greeting from white card and glue both of these diecuts on top of the spotty circle.


11. Attach the front of the gusset to the card front with double sided tape.

12. Decorate the front of the card with a white diecut made using the Filigree Flourish die set. Add a bow made from embroidery thread and some gems to the centres of flowers.

Enjoy!

Ruth :)


Thinking of You - Dovecraft Floral Muse

 Hello :)  I'm doing a bit of prep for my demo at Easons, O'Connell Street, Dublin on Saturday.
This is a card made using lots of lovely Floral Muse papers and embellishments which I'll have with me then.


Friday 26 February 2016

Congratulations!

I just had to make another card this shape :)
This time I've used The Promise papers from Trimcraft with Tonic Studios Congratulations, Tangled Trellis and Floral Heart die and stamp set.
I've added a fine line of glitter around the edge of the patterned paper.

Thursday 25 February 2016

How to make a Dovecraft Floral Muse easel card (Trimcraft)


Floral Muse.
Another beautiful new Dovecraft collection by Trimcraft! I love these collections and they just seem to get better and better...each new release seems to be my new favourite :)
You  can see all the steps in making this easel card below.

You will need ;
Dovecraft 6x6 Polka Dot Embossed card
Dovecraft Floral Muse 6x6 paper pad
Dovecraft Floral Muse Heart Accordion Stickers
Dovecraft Floral Muse Plastic Buttons
Dovecraft Floral Muse 3D Butterflies
Dovecraft Floral Muse Adhesive Pearls
Dovecraft Floral Muse Wooden Frames
Dovecraft Floral Muse A5 Sentiment Stickers

Trimcraft First Edition Foliage dies
Trimcraft First Edition Buckles, Frames and Borders dies
Dovecraft Crafters Glue
Dovecraft Double sided tape
Dovecraft double sided foam tape
Dovecraft Glitter Glue - Crystal

 1. Score and fold the front of the card in half.

 2.Cut 2 pieces of patterned paper - the back one at 7cm x 14.5cm and the floral one at 6cm x 13.5cm) for the top part of the easel card. Cut a piece of white card measuring 5.5cm x 14.5cm and a piece of patterned paper exactly the same size. Cut a piece of pink patterned paper measuring 5cm x 13.5cm to layer on top.


 3. Layer the two papers onto the top folded part of the card with double sided tape.
Attach the taupe coloured patterned paper directly on top of the white card and then the smaller piece of patterned paper on top with double sided tape. 
Attach this part to the base of the card by using double sided tape on the edge which is farthest away from  the centre and use foam tape along the edge which is closest to the centre. This creates the stopper for the easel.

 4. Attach 2 Heart Accordion stickers to the top of the card and add plastic buttons in the centres. Add a 3D butterfly.


 5. Add some Adhesive Pearls to the hearts and butterflies.


 6. Die cut two leaves from white card and glue beside the hearts. Die cut a white border and attach across the centre of the easel stopper.


7. Add  the glitter sticker inside the wooden frame and overlap the butterflies' wings on the wood.

 8. Add glue to the back of the frame and 3D foam tape to the back of the sticker.

 9. Attach on top of the border die cut.

10. Add a fine line of Glitter Glue around the edges of the patterned paper.


Wednesday 24 February 2016

It's Your Big Day

This is another of my samples from last Saturday's demo.
I used Tonic Studios It's Your Big Day, Felicity Butterfly and Breena Fairy dies.
It's a really simple card to make - especially if you use good quality double sided papers.I've used Trimcraft's First Edition Love Story 8x8 paper pad.

Trimcraft Foil Applicator

This is a card I made up with some of  the diecuts which I foiled at Staurday's demo using the Trimcraft Foil Applicator. I had some card printed in plain black at my local photocopy store and I have been using it to cut out some of the Trimcraft die shapes which I have then foiled.


Monday 22 February 2016

Decorating a shelf frame with the Dovecraft Floral Muse collection

I've used the beautiful vintage floral papers and embellishments from the new Dovecraft Floral Muse collection by Trimcraft to decorate a wooden House Shaped Shelf which could be used as a little keepsake or gift.

You will need:
House Shaped Shelf
Chalk Paint (Cream)
Dovecraft Floral Muse 6x6 paper pack
Dovecraft Floral Muse 12 x 12 paper pack
Dovecraft Floral Muse Wooden frames
Dovecraft Floral Muse Creative Ribbons
Dovecraft Floral Muse Adhesive Pearls
Dovecraft Floral Muse Accordion Stickers
Dovecraft Floral Muse Paper Flowers
Dovecraft Floral Muse Plastic Buttons
Dovecraft Floral Muse A5 Sentiment Stickers
Dovecraft Floral Muse Card Butterflies
Dovecraft Floral Muse Mini Bows

Dovecraft Crafters Glue
double sided tape
Trimcraft First Edition Windows dies
Trimcraft First Edition Tags dies
white card
Die cutting machine
Craft knife
Hot glue gun

How to make it:

 1. Paint the frame with chalk paint.


 2. Cut the patterned paper to fit the shelves. Attach to the back with Crafters Glue.


 3. Glue a wooden frame into the top shelf and add a ribbon bow at the top. Snip 2 tiny butterflies from the 6x6 patterned paper and glue to the frame with a little pearl in the centres.


 4. Cut a 2.5cm strip from across a 12 x 12 sheet of patterned paper. Pleat it and glue across the bottom of the top shelf.


 5. Glue a length of lace ribbon across the paper pleat and add a pearl at each end.


 6. Attach an accordion sticker to the top left shelf.


 7. Add an A5 sentiment sticker in the shelf below. Glue one large paper flower to the top left and 2 
smaller flowers to the bottom right.


8. Die cut a domed window and glue to the largest shelf. Die cut a window box in white card and glue a little piece of patterned paper behind it. Die cut the flowers from patterned paper and glue on top of the white card. Attach the window box with hot glue.

9. Die cut 2 tag shapes - one from white card and the other from patterned paper. Glue the patterned one on top of the white one , offsetting slightly. Add a card butterfly on top with a pearl in the centre. Glue the tags into the bottom left shelf.


 10. Take one of the wooden frames and apply glue over the surface. Place the frame, glue side down on top of a piece of patterned paper.Cut around the outside and the inside with a craft knife.


 11. Attach 2 accordion stickers inside the bottom middle shelf and glue the frame on top of the wooden shelf.


12. Die cut a tag shape for patterned paper and 3 small tags from white card. Glue the small tags on top as shown and add a button on each. Add a bow to the top and some pearls along the bottom and glue inside the bottom right shelf.

Enjoy :)


Saturday 20 February 2016

Craftworld, Belfast today - thanks

Thanks a million to everyone who came along to my demo at Craftworld, Belfast today. I hope you all enjoyed it. The new look demo room looks great and it was lovely to be able to relax and enjoy ourselves out of the main shop area.The girls at Craftworld did a fantastic makeover of the room.
Thanks to Rachael for being my minder...and keeping smiling all day :)
I took the top photo this morning and "pinched" the next 3 from Craftworld's page when I got home.


 Looks like sign language!

Getting going again after lunch.

I grabbed a few photos of some other interesting creations while I was there..

Rachael with some of her chalk painting :)


And some beautiful painting and embroidery done by Mandy showing how she has used the fantastic Derwent Inktense pencils.


I'll post some photos of the things I made today at the beginning of the week.