Friday 31 December 2021

How to Make a Scene with Campfire Critters - Tonic Studios Stamp Club (affiliate)


This fabulous set has lots of cute small stamps with coordinating dies which can be used in many combinations to create scene cards and projects.

These are my affiliate links to the set


     I have also made 3 completely different cards using the same set and you can see them in my video


To make this card you will need

Campfire Critters Stamp Club Stamp and Die Set 
Craft Perfect A6 Bright White Card blank
Craft Perfect Card - Arctic Blue, Misty Grey, Pewter Grey, Avocado Green
Smooth White Card 300gsm
Nuvo Deluxe Adhesive
Nuvo Alcohol Markers - Dark Slate, Lemon Drops, Plum Tomato, Coconut Shell, Skylight Blue, Aqua Spray, Natural Patina, Soft Taupe
Black Ink
Crystal Drops - Buttermilk and Red Berry
Vintage Drops - Pioneer Green
Nuvo Glitter Gloss Aqua Shimmer Pen


 How to make it -

1. Cut a piece of Arctic Blue card to 15cm x 10.5cm.


2. Die cut 2 mountain ranges, one from Misty Grey and the other from Pewter Grey. NB leave 8cm from the highest peak to the bottom of the grey card. Glue the Pewter Grey on top of the Misty Grey, offsetting slightly.


3. Cut a strip of Avocado Green card measuring 15cm x 1.5cm and glue to the bottom of the Arctic Blue card. Then glue on the mountain ranges above this.

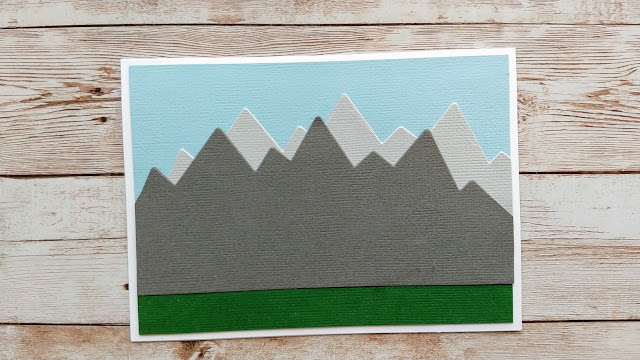
4. Trim off the excess grey card and glue the panel onto the white card base.


5. Add shading to the Pewter Grey mountains with the Dark Slate marker.


6. Die cut some white snow caps and glue to the tops of the mountains.


7. Stamp and die cut the log cabin, caravan and tent. 
Colour the log cabin with the Coconut Shell, Plum Tomato and Lemon Drops alcohol markers.


8. Colour the caravan with the Skylight Blue, Aqua Spray, Natural Patina, Soft Taupe and Dark Slate markers.


9. Colour the tent with the Aqua Spray and Skylight Blue markers.


10. Die cut the trees shown in the photo and glue in place.


11. Glue the coloured images in place as shown, leaving some space behind the caravan free from glue to add more trees.


12. Add more trees as shown, tucking the smaller ones in behind the caravan.


13. Die cut clouds and glue into place.


14. Add detail to the mountains with the Glitter Gloss pen. Create a grassy area around the log cabin with the Pioneer Green Vintage Drops and some flowers in the foreground with the Buttermilk and Red Berry Crystal Drops.


Thursday 30 December 2021

My cards in Creative Stamping magazine issue 103 (and rspb Papercraft Special issue 1) with video #affiliate


I have some cards in both the rspb Papercraft Special issue 1 and Creative Stamping Magazine issue 103 at the moment.


In this video I give you a look through both magazines and show you what I have made as well as all the freebies and lots of other gorgeous inspiration from other crafters.
If you're interested in buying either of these magazines you can fine them through my affiliate links here
Creative Stamping Magazine issue 103

rspb Papercraft Special issue 1 (as shown in the video)

rspb Papercraft Special issue 1 (plus Riverbank Tales Stamp bundle)

Tuesday 28 December 2021

Mid week Deals from Tonic (affiliate)


I totally forgot about the Mid Week Deals (well, I actually didn't know what day it was!)
Here are my affiliate links as usual

Layering Tag Die Set Bundle rrp £74.94 now £29,99!!
Sentiment Bundle rrp £32.45 now £11.36!
Goodie Bag rrp £83.40 now £22.00!!
Goodie Bag (2) rrp £84.94 now £22.00!!
Mystery Die Bundle rrp £100 now £25.00!!

USA -
Pandora's Gift Box Bundle rrp $98.44 now $39.38!!
Die Triple Pack Bundle rrp $41.97 now $12.59!
Die Quad Pack Bundle rrp $31.96 now $9.59!
Glass Mat 12 x 12 rrp $18.49 now $11.09!

and now I'm off to relax for the evening.
Enjoy :)


Monday 27 December 2021

SALE - Pens, Paints and Pencils up to 60% off at CraftStash (affiliate)


I know some of you are on the lookout for post Christmas bargains so I'll be adding links here if anyone wants to check them out.
Today I've seen that there's up to 60% off Pens, Paints and Pencils on the CraftStash website
Sakura Koi Colour Brush Pen Set rrp £24.99 now £17.99
Spectrum Noir Colour Creation Kit rrp £74.99 now £41.29
and lots more!


Sunday 26 December 2021

How to Make a Cuckoo Clock - Tonic Studios Die Set (affiliate)


The Cuckoo Clock Die Set from Tonic's Showcase Collection makes the most adorable 3D ........Cuckoo Clock!  It can be used as a gift box with either a top or bottom opening. It brought back so many memories of many lovely holidays in Switzerland and the Black Forest and I couldn't wait to get started. 

These are my affiliate links to the die set


I made a dark clock, using shades of brown card to resemble an actual wooden clock (like the one we were given as a present by a lovely German family who came to stay with us) and two other variations on that and you can see how I made them in my video here - 


However, for this blog post, I thought I'd add a burst of colour!


You will need;
Cuckoo Clock Die Set
Craft Perfect Card - Ivory, Rose Pink, Gold Mirror, Avocado Green, Misty Grey
Nuvo Deluxe Adhesive
Party Pink Crystal Drops

How to Make it:

1. Die cut 2 of each of the dies shown (sides, back and front) from Ivory card.. Fold at the score lines and burnish.


2. Use both dies shown to create 2 patterned panels from Rose Pink card and glue to the centres of the side panels.


3. Die cut the plain outer die from Rose Pink card and glue to the back of the clock. Use all 3 dies together to cut out the panel for the clock front. Glue both die cuts to the front and back panels.


4. Use the small arched die to create the doors. Cut out the cuckoo from Misty Grey card and glue behind the aperture.


5. Die cut an Ivory circle for the clock face. Use the same die with the slightly larger scalloped die to cut out a gold clock frame and the small die shown at the bottom right to cut out gold clock hands.


6. Glue these pieces in place.


7. Cut off the piece shown from one side panel, then glue the panel to the back of the clock using the glue tabs.


8. Glue the other side on in the same way, gluing the tabs together at the top.


9. Glue the front in place in the same way.


10. Die cut an Ivory window and shutters. and a little fence. Die cut 2 pieces of Avocado Green Ivy and glue in place.


11. Die cut 3 of the roof tile shapes from Rose Pink card. Fold one and burnish the fold line well. Glue to the top of the clock, only adding glue along the top edge. Snip the other 3 in half and glue the tiles onto the roof, tucking the bottom edges in below the tiles above.


12. Die cut the foliage from Avocado Green and glue to the side panel. Die cut one of each of the flowers from Ivory card, shape with an embossing tool, glue together and glue on top of the foliage. Add a Crystal Drop in the centre.


13. Die cut 2 pieces of Avocado Green ivy. Snip a little off to shorten and glue to the front of the clock as shown


Monday 20 December 2021

Sweet Heart Bouquet - Tonic Studios Craft Kit (affiliate)


Hello :)Today I'm sharing with you the my unboxing video of the Sweet Heart Bouquet Craft Kit (51) from Tonic. After the unboxing I also show you how to make 2 different cards with the contents. I've used the gorgeous card and paper from the kit but don't forget that, when your card is finished, you can still get plenty of use from the dies and stamps alongside other papers to give a very different look.
I hope you like these cards. Which one is your favourite?
You can buy the kit here (affiliate links)


Thursday 16 December 2021

Mini Desk Tidy / Gift Box (Tonic Studios) #affiliate


I've got the Mini Desk Tidy ( from Tonic's Designer's Choice series) to share with you today, It's so cute! You can see from the title that I have added "Gift Box" onto the name as I loved this idea.
These are my affiliate links to the set
You can make the desk tidy up in 2 different ways and I show you both in my video here.


The shaped compartments can either be on the inside or the outside. I can just imagine this with min gifts in all the pockets, wrapped in cellophane and tied with a bow! It would look fab decorated with Christmas themed paper!
I'm sure you'll have your own ideas of what to put in it but I hope you like mine :)
I have used
Beautiful Memories 12 x 12 paper pad