

The Deckle Torn Edge Trimmer adds a
whole new dimension to your crafting!
These are my affiliate links if you'd like to check it out
It is designed to give your card
edges a distressed look and is perfect for creating both clean and inked effect
to layers. It is both sturdy and easy to use with dual measuring guides at the
top and bottom, a grid base and a soft grip handle.
The deckle effect is slightly
different at the top and bottom so you can use either for a different finished
result.


BOTTOM

This is how the deckle edge varies
along the length of the trimmer.
Card 1
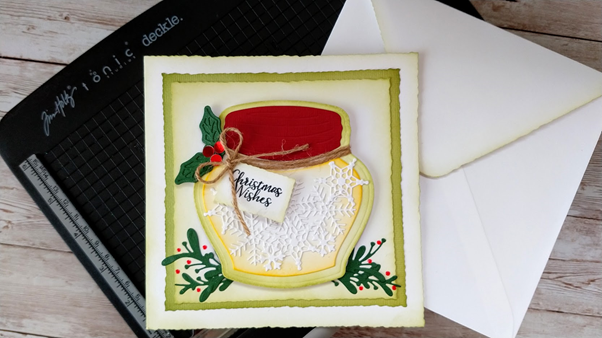
I love the way the torn edge effect
works so well with ink.
Here are my affiliate links to the Festive Treats Mason Jar die set
USA - https://shrsl.com/36dtp
To make this card you will need
Tim Holtz Deckle Torn Edge Trimmer
Festive Treats Mason Jar die set
Craft Perfect 6x6 Bright White card
and envelope
Craft Perfect 300gsm Bright White Smooth
card
Craft Perfect Pistachio Green card
Craft Perfect Cherry Red card
Craft Perfect Avocado Green card
Craft Perfect Ruby Red High Gloss
card
Craft Perfect Classic Jute Twine
Nuvo Hybrid Ink- Dried Oregano
Nuvo Crystal Drops – Red Berry
Craft Perfect 3D foam pads
Craft Tacky Glue
Black Ink
Hole punch

1. The trimmer is strong enough to
cut through a Craft Perfect card blank. As you can see it is possible to trim
just a sliver from the cardstock!
I have trimmed a 66x card on 3 sides
and inked the edges with Dried Oregano ink.
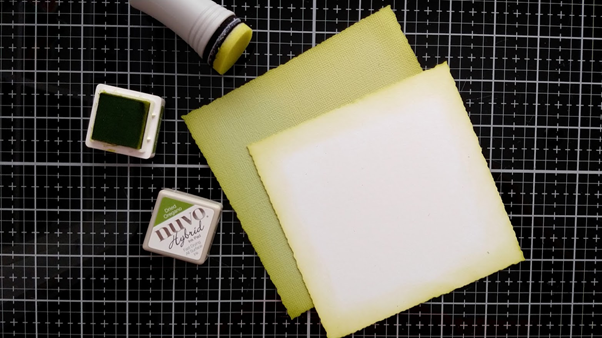
2. I trimmed a 13cm square of Pistachio
Green card and a 12 cm square of white card and inked the edges before layering
them on to the card front.

3. While I had the trimmer on my desk I also trimmed around the flap of the envelope and inked it.

4. I used the same ink to distress the white background die cut from the Festive Treats Mason Jar die cut and Rubber Duck ink to distress the bottom inner die cut before gluing both in place. Then I wrapped some twine around the top and attached the jar to the card on 3D foam pads.
I die cut and glued the lid in place
and some white snowflakes in the jar. After adding some foliage I stamped the
Christmas Wishes and cut with the Deckle Edge Trimmer and inked to match. I made
some berries from the red mirror card and a hole punch and glued them to the holly.
Card 2

For my second card I have made a
layered strip of deckle edged card to show off the die cuts.
To make this card you will need
Tim Holtz Deckle Torn Edge Trimmer
Festive Treats Mason Jar die set
Craft Perfect US A6 Bright White card
and envelope
Craft Perfect 300gsm Bright White Smooth
card
Craft Perfect Pistachio Green card
Craft Perfect Cherry Red card
Craft Perfect Avocado Green card
Craft Perfect Classic Jute Twine
Nuvo Crystal Drops – Red Berry
Craft Perfect 3D foam pads
Craft Tacky Glue
Black ink

I layered them together and glued
them to the card front.
Then I used the long foliage die from
the Mason Jar set to cut 3 Avocado Green branches and 2 Pistachio Green
branches and glued these as a bunch to the card front.
I stamped the sentiment onto white
card, cut with the trimmer and attached above the foliage with 3D foam pads.
Lastly, I added a twine bow and Red Berries Crystal drops.


No comments:
Post a Comment
Thanks so much for taking the time to leave a comment, it's lovely to hear from you. Ruth