Friday, 29 January 2021

Tonic Studios Stamp Club 5 - Backgrounds and Borders (affiliate)


Stamp Club 5 is on the Tonic website now! It's called Backgrounds and Borders
🛒USA - https://bit.ly/3adQCD3 (affiliate links)
The name speaks for itself and this set is great fun to use along with so many of the Nuvo products.


I made a stencil with some of the dies and used Expanding Mousse through them to add to the whole Nuvo look background :)


On these next 2 I used the dies instead of the stamps


Thursday, 14 January 2021

Tonic Studios Designer's Choice 15 - Delicate Daisy Gift Box

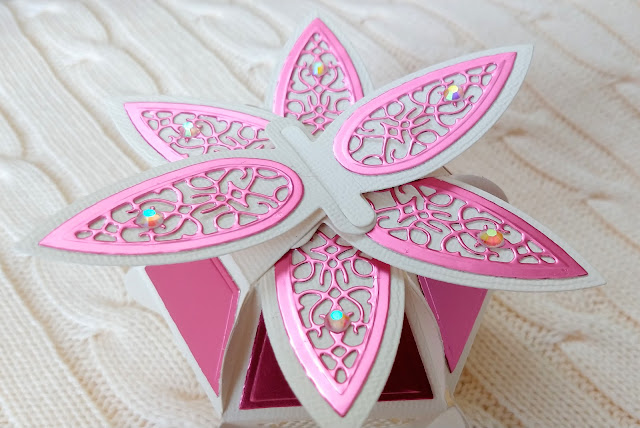
The dies in No. 15 of the Designer’s Choice series make up a beautiful little hexagonal gift box with petals forming the closure at the top. 

These are my affiliate links to where you can buy the dies set.
🛒UK - https://bit.ly/2XC4pxs
🛒USA - https://bit.ly/3bz7nuO

Along with the dies, I have also used -

Craft Perfect Ivory White card

Craft Perfect Pink Chiffon Satin Effect card

Nuvo Deluxe adhesive

Nuvo Crystal Gems.


You will need to cut a base and 6 sides and it’s very important to die cut 3 of each of the sides ie 3 with slits and 3 without.

So. let's get started! These are the dies in the set.

1. Die cut 3 of each of the 2 dies shown – 3 with slits and 3 without.


2. Use the die shown to cut the detail into the bottom part of each of the 6 die cuts.


3. Die cut 6 of the smaller 4 sided shapes with the straight edges


4. Attach these to the ivory panels as shown. I find it works best using double sided tape as sometimes the glue leaves a mark showing through the satin effect card.


5. Use the large plain edged petal shape with the matching decorative die in side to cut out 6 petals from the Pink Chiffon card. If you are not used to die cutting it might be best to use these separately ie die cut the petal shape first and then cut out the detail afterwards but if you have them well spaced and taped down they should not move or get damaged while passing them through the die cutting machine.

6. Glue the petal die cuts to the top of ivory panels. Fold the bottom tab inwards and the side tabs outwards. Fold the other score lines inwards. 


7. Add glue along the bottom tabs and attach each glued tab to the underside of the base.


8. Remember to attach the panels around the base by alternating the ones with slits with the panels without slits!


9. Glue the side tabs together. I find it helpful to use mini pegs to hold these in place while I continue to attach the rest of the tabs.


10. Fold opposite petals across the top of the box and slide the petal without the slit through the petal with the slit.


11. Continue to fold the petals over the top of the box until they are all connected.


12. Add gems on each petal.


Tonic Studios Designer's Choice 15 - Delicate Daisy Gift Box (affiliate)


Yay! The Tonic Studios Designer's Choice 15 has just been launched!

It's the cute little Delicate Daisy Gift Box!

The dies can be used to make this sweet little Delicate daisy Gift Box nut can also be used to add decorative elements on cards.
🛒UK - https://bit.ly/2XC4pxs
🛒USA - https://bit.ly/3bz7nuO (affiliate links)


In this video I show you what you'll find in the set and also how to assemble a gift box using the dies, with some extra tips along the way :)

Wednesday, 13 January 2021

Die Cutting Essentials issue 73

Good morning :)
These are my cards in the latest issue of Die Cutting Essentials magazine (no. 73) I have used the beautiful dies which are free with the issue, which is available to buy now :)


Friday, 8 January 2021

Tonic Studios Craft Kit 40 (incl YouTube video) (affiliate)


It's release day for Tonic's Craft Kit No. 40!!

You can check it out through my affiliate links here - 

UK - https://bit.ly/3hWBb5v

USA - https://bit.ly/2XlR8sP

Kit 40 is called "Pivot Gift Box" and this is what you'll find inside


I have made a gift box and a little "tray"


You can see my video of the unboxing of the kit and alo how to make the gift box here


I just thought I'd show you how my creations go through Quality Control!


Monday, 4 January 2021

Two Embossing Techniques on One Card - Tonic Studios (affiliate)


I have used the beautiful Midnight Meadow Silhouette die set as the focal point of this card and used embossing powder in 2 different ways to give it a lovely shiny effect.
I used clear embossing powder over an inked background for the sky and then some silver glitter embossing powder around the edges of the large rectangle to make it pop! 
Something magical happens every time the heat gun melts the powder! 

My affiliate links to the die sets used are
Midnight Meadow
🛒UK - https://bit.ly/3neVWdI
🛒USA - https://bit.ly/2KXFC40

Deco Fleurs Layering Dies
🛒UK - https://bit.ly/2LnomoA
🛒USA - https://bit.ly/3581Wid

Embossing Powder -
🛒UK - https://bit.ly/3b5y5Ll
🛒USA - https://bit.ly/2XbLlWq

To make this card you'll need the following - all from Tonic Studios

Craft Perfect 5x7 Bright White card blank
Craft Perfect Glossy Black High Gloss Mirror Card
Craft Perfect Golden Satin A4 Luxury Embossed Card
Craft Perfect Jet Black Texture Weave Card
Craft Perfect Chrome Silver High Gloss Card
Craft Perfect Smooth Card - White
Midnight Meadow Silhouette Die Set
Deco Fleurs Layering Frame Die Set
Nuvo Hybrid Ink Pads - Carrot Stick and Rubber Duck
Nuvo Clear Mark Embossing Pad
Nuvo Crystal Clear Embossing Powder
Nuvo Silver Moonlight Glitter Embossing Powder
Nuvo Blending Sponge
Double Sided Tape 
3D foam tape

Craft Tacky Glue
Die cutting machine
Heat Gun
Corner rounder punch (optional)


How to make the card

1. Die cut the rounded rectangle from the Midnight Meadow die set and ink with Rubber Duck and Carrot Stick ink from an ink sponge. Leave to dry or dry with a heat gun.


         2. Cover the inked area with Clear Mark ink, dabbing with the ink pad to cover the whole area.


3. Pour over the clear Embossing Powder while the ink is still wet.


4. Tap off the excess powder (back into the bottle).


5. Melt the powder with the heat gun.


6. Set aside to cool for a minute or so.


7. Using the 2 dies shown, die cut the fox image from black card.


8. Use the fox die cut as a guide to mark where the moon and stars go, then remove and die cut the moon and stars.


9. Use the rounded rectangle to cut out the silver shape and then the two dies shown to cut out the foliage from black card.


10. Snip off some of the foliage to make more of the shiny sky visible.
Glue the coloured sky piece to the silver card and add the two silhouette panels on top.


11. Cut a 6.5cm x 14.5cm rectangle of black card and round the corners.
Ink around the edges with the Clear Mark ink pad as shown.


12. Pour Silver Glitter Embossing Powder over the Clear Mark Ink.


13. Tap off excess powder.


14. Melt the powder with the heat gun.


15. Attach the fox die cut panel to the black panel with 3D foam tape.

16.  Attach an 11.5cm x 16.75cm rectangle of gold embossed card to a 12cm x 17.25cm of black gloss card with double sided tape. NB. don't use glue as it can show through the card.  Attach this to the card front with double sided tape. Die cut the shape shown from the Deco Fleurs Layering Frame die set into black gloss card and attach to the gold and black panel with double sided tape. Glue the silhouette panel on top.