

In this Step by Step Blog Post I show you how to make a memory book from scratch (the one on the left in the first photo) but you can also see how I made a different memory book using the same die set in my video here
The fabulous “Today’s Treasures” Memory Book die set has 71 dies (2x A4 sheets) and you can use it to create 3 different sized handbag themed books.

This is the complete die set and you can use the dies to make holes for threading ribbon through to join the pages. In this example I have used the Simple Spines die.

The gorgeous new Mulberry Wine paper
pack.
How to Make it

1. Die cut 2 of the largest die,
leaving 4.25cm of card attached after the notch as shown. Score and fold both
pieces between the notches.

2. Die cut the spine and trim to fit inside the
book covers (10.75 long). Fold all the score lines and glue the ones with the
marks to create a spine. Glue to the inside flap of the back cover and then
adhere the front spine over the top.

3. Use the same die to cut 2 more
pieces the same and trim both of these down as shown. Adhere to the inside
front and back covers.

4. Cut out the die shown on the left
leaving 4cm extra at the top. Fold along where the top of the die stops and
then at 1.5cm from the top.
Die cut the outline die on the right from Venetian Gold card and paper piece the flowers back with Aubergine card.

5. Punch a hole at 1cm from each side
on the area between the front flap and the glue tab. Add a length of ribbon and
glue in behind.

6. Glue a 12cm x 2cm strip of
Aubergine card across the top fold to cover the ribbon. Cover the front and
back panels with a raspberry panel.


9. Sandwich and adhere a Large Craft
Magnet between the 2 die cuts shown.


11. Create a stack
of 2 latch die cuts and 3 of the circular die cuts , as shown. Glue to the
underside of the latch.

12. Sandwich and
adhere a Large Craft Magnet along with the gold circular circle die cut as
shown.

13. Deboss the
initial dies into the gold rectangle (one at a time) and glue to the top of the
latch.

14. Snap the magnetic latch together,
position on to your book, then adhere the lock to the base and the latch to the
front flap. Allow the glue to dry fully before opening and closing the magnetic
lock.

15. Die cut the sentiment from gold card and the backing plate from white card. Glue together and attach to the Aubergine card with 3D foam pads.

16. Fussy cut some flowers from the
paper pack and adhere above the sentiment. Die cut 2 Sea Salt corners, snip and
glue in as leaves behind the flowers.

17. Die cut 6 white page dies (smaller than the front cover and trim level with the notches as shown.

18. Glue these together and glue over
the page tabs of the spine.

19. Use the 2 dies shown to cut plain
and patterned panels and adhere these to each side of all the pages.


PAGE 2. Using the dies shown attach a
photo mat and add the sentiment above on 3D foam pads. Fussy cut flowers and
glue to the bottom right of the photo mat, leaving space to place a photo in behind
the flowers.

PAGE 3. Use both dies shown to create
a frame and the bigger one to die cut a vellum panel. Glue the vellum behind
the frame and add a row of adhesive foam/ 3D foam pads. Reserve the centre die
cut to make a tag.

Use the little die shown to create a
tab for the tag and add ribbon. Glue a fussy cut flower to the bottom left
corner of the tag.

15.
Cut out 2 panels with the bigger die shown and adhere together at the
top. Cut a panel of patterned paper with the smaller die and glue on the front.
Add a 9.5cm x 1.5cm strip of Aubergine card across the top.

This will fit over the strip across
the page.

PAGE 5. Adhere 2 gold corners to the
bottom of the page and adhere a fussy cut flower and short ribbon loop to a
white die cut tag.

PAGES 6 & 7. Using the 2 dies shown cut out a white panel and a patterned panel. Layer these together and cut in half. Add a narrow strip of Aubergine card down the opening. Attach one as a pocket on the left of page 6 and the other on the right side of page 7.

PAGE 8. Die cut the larger shape
shown 2 times from white card, trimming at the end of the die. Score and fold
at the notches. Adhere the folded parts to the back of an 11cm x 7cm piece of
white card and glue to the centre of the inside cover. Die cut the smaller panels
4 times from patterned paper and glue to the inside and outside left and right
panels. Punch a small hole in each and add ribbon. Cover the ends of the ribbon
with 2 gold circles on the inside.
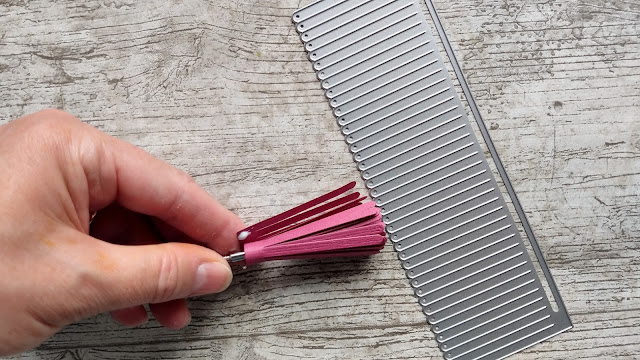
Making the tassel –
1. Die cut this die from Aubergine
card. Roll up with a quilling tool and glue the end.

2. Glue the tassel at the head to
hold the shape and glue the circle part of the wrap over the tassel head.

3. Fold and glue down the wrap die
cut and glue the long rectangle around the tassel.
Fold and glue the hook to the top of
the tassel and cover this with the cap die cut.

4. Attach the ribbon to the handle
with a length of ribbon.

5. Die cut the tassel die once more
and snip to fit across the top of the book at the back. Glue in place.
No comments:
Post a Comment
Thanks so much for taking the time to leave a comment, it's lovely to hear from you. Ruth