Thursday, 29 November 2012

Best Wishes


I spent a while in the garden yesterday doing some tidying up for the winter and got the last of the tender plants safely tucked up in the shed/summer house. I usually cut the fuchsias right back at this time of year but they had so many lovely flowers still on them that I just gave them a tidy up and put them at the front where I could see them from the garden. 
Anyhow, because I have drawn so many of them this year, I can still have their blooms during the winter! One of my favourites has got to be Swingtime and I've coloured the one in this card in "Swingtime colours"...carmine and ruby.
In case you haven't seen it yet, the Fuchsia Window die is one of my new designs in the Pick of the Bunch range for Tonic Studios. The die cuts a lovely frame/window with a fuchsia shape at on end and ivy at the other. These can be embossed / stamped with the coordinating Clear Stamp Die Toppers / or both as in this card. I've also used leaves from the Window Basket Die set, beautiful Petal Pairs and the "waste" from the Daisy Border punch.
The silver border down the sides was created with the Daisy Border 2 punch and the corners are the Multi Detail Heart punched shapes.


Wednesday, 28 November 2012

Little boxes with lids from Square dies


I made some of these little boxes a few weeks ago and forgot to blog the details until I was reminded by a lady at the Belfast Crafts Fair - better late than never!

I've used DCWV Sweet Owl paper for the box and added a little raffia to the lid.
 1. Cut a rectangle of paper measuring 18cm x 13cm and score at 2cm, 6cm, 10cm and 14cm. Score at 4cm on the other side. Fold all score lines.

 2. Cut out the little corner piece which measures 2cm x 4cm and cut upto the 4cm score line where shown.

3. Put DST on the pieces shown above.

 4. Stick the bottom pieces together, overlapping tightly, leaving the one without the DST to the outside.


5. Stick the bottom flap and the side piece last.


I decorated the box with a white Daisy strip punch, added some Classic Daisy punched flowers and a couple of leaves from the Pick of the Bunch Window Basket die set.


Here's how I made the lovely little lid..

 1. Diecut the Daisy Square die and line up on your Super Trimmer as shown - ready to score between the centre petals of the daisies on each side.


 2. Score on all 4 sides in the same way.


 3. Turn the diecut over and fold.


 4. Snip out the corners as shown.


 5. It should now look like this..


6. Fold the corners over and stick together using MyStik  Repositionable Dots.

I poked a little hole in the centre and added some raffia, then glued a raffia bow on top.

Monday, 26 November 2012

Making a cabinet from a window die


This is another cabinet which I made from the Tonic Studios Domed Window Die and I've added a little tutorial to show how I made it.

This die, along with the Trellis Wall, Window Basket and the coordinating stamp set can be seen on Create and Craft today at 2.00pm and 6.00pm...along with lots of other Tonic goodies.

 1. Die cut and emboss the window, then draw around it on a longer piece of card. Continue the side lines for another 4.5cm and cut out.


 2. Cut out a little drawer measuring 7cm x 2.5cm . Using the grid on the Tonic Studios Super Trimmer as a guide emboss an inlay with a fine embossing tool as shown.


 3. Place the window and drawer on the cut out cabinet and then place a Spellbinders die (or similar) centrally below the drawer and mark the position.


 4. Die cut the leg shape.


5. Attach the window and drawer to the back piece with 3D foam squares from Scrapbook Adhesives by 3L.

I have added gems to the drawer as handles, inked the cabinet and used the stamps from the Pick of the Bunch Through the Window set (coloured and cut out) as ornaments .


Saturday, 24 November 2012

Create and Craft news


A heads up again to let you know the Pick of the Bunch dies (Trellis Wall, Domed Window and Window Basket) by Tonic Studios will be on Create and Craft on Monday again at 2.00pm and 6.00pm


The card pictured above shows how to use the Domed Window die in another different way...I just popped it up on 3D foam squares made a little drawer and added some of the stamps from the new release stamp sets. The carriage clock is the top which I cut off the Grandfather clock stamp and I've added Crackle Glaze to the face.

I think this would also look lovely with a white cabinet and red and white gingham background - Scandinavian style..


Thursday, 22 November 2012

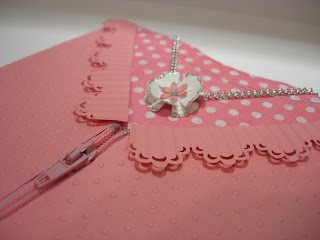
Cardi with zip


Another of my card(igan)s.... this time with a little zipper which I bought in a haberdashery shop. Isn't it cute? 
The border punch this time is the Victorian Border punch by Tonic Studios and I've added a little necklace made with Petal Pairs punches and a mini Daisy in the centre.

You can find the instructions HERE for the basic card if you scroll down a little.


Wednesday, 21 November 2012

Congratulations, Heather!!


Congratulations, Heather on being runner up in the Getting Married in Northern Ireland Readers Awards.
Paperworks at the Linen Green came second in the Best Wedding Stationery Category!! Well done, Heather!! Lovely photo,too!!


Tuesday, 20 November 2012

Christmas Door


When is a window not a window?....when you use the window die to make a door ;)


Another little idea today for using the new Domed Window die from my new die and stamp release by Tonic Studios...I've simply used the "waste" from a couple of diecut windows, added some 3D foam squares and made a door.

Here's how I did it.

1. Die cut the frame,then turn the whole thing over with the pieces intact. Emboss the inner lines with a fine embossing tool - you'll "feel" the lines as you follow them.


2. These are the pieces from one window - you'll need an extra 2 squares from another die cut.

3. Attach the pieces as shown to a piece of white card measuring 7.5cm x 14cm using 3D foam squares from Scrapbook Adhesives by3L.

4. All arranged (I've inked the edges for definition). 

5.The little door latch was made using 2 petals from one of the Petal Pair Petite punches with a brad in the centre.

6. Draw a line around the door as a guide and stamp up the background with the two brick corner stamps and the topiary tree stamp from the Country Cottage stamp set.

7. Attach the door to the background with the E-Z Runner (Scrapbook Adhesives by 3L)

I made the wreath with the Tonic Studios Simplicity Holly Leaf punch and added some ivy above the door from the Pick of the Bunch Window Basket die set.

I kept a long list of ideas using all the new dies and their "waste" when I was designing them so there will be plenty of inspiration coming ....think "chocolate", "oranges and lemons" etc. I'm sure you'll have plenty of ideas which I never imagined too so feel free to share!!

Friday, 16 November 2012

Golden Anniversary card


Before I give the "lowdown" on today's card I just want to say how lovely it was to meet so many really friendly crafters yesterday at the Kings Hall. We collected Jodie at the airport in the morning and dropped her off thinking she'll never make it through the day because she was so tired after punching in so many hours in the last week or two but when we arrived back later, there she was doing what she does best - smiling, chatting and,of course, demoing lovely flowers!
It was great to meet Mary who had come all the way from Donegal and was making the most of the day..
It was also a great pleasure to find Norma on the Crafters and Co stand. We could have chatted all day!
I couldn't believe it when I quite literally bumped into Peggy (Docrafts)....sorry if I almost mowed you down.. 
A big "Hello" to Liz and Marie whom I first met a couple of weeks ago at Paperworks in Dungannon - you two do get around!
I really must say how nice it was to have a chat with Lesley (Castlereagh)  - thank you so much for all the nice things you said!

Ok, the card...if any of you were watching Create and Craft or Ideal World on Tuesday night or Wednesday then you might recognise the die on this one as the Peony Window - one of the new set which I designed for Tonic Studios. I've die cut it in gold and made a shaker card from it with little gold hearts in behind the acetate. The embossing stands out really well on the gold card so I didn't use the coordinating stamp this time.
I've added two of the Floral circle die cuts and added gold flowers. The hearts at the top were made with the Multi Detail heart punch and the Classic Heart punch

The same die was used for the card I blogged a couple of days ago but I used the stamps on the silver one and used the frame vertically instead of horizontally.

Wednesday, 14 November 2012

New dies and stamps.....Ideal World and Create and Craft today


Here's another card I made with some of my new designs of dies and stamps for Tonic Studios.
The dies used are Fuchsia Window, Trellis Wall, Domed Window (top) and the topper stamp for the Fuchsia Window.
Today's schedule is below;


Wednesday 14th November
08.00 -  Ideal World  - Tonic Studios (Pick of the Bunch ) Pick of the Day

Wednesday 14th November
10.00 -  Ideal World  - Tonic Studios (Pick of the Bunch ) Pick of the Day

Wednesday 14th November
12.00 - Create and Craft  - Tonic Studios (Pick of the Bunch ) Pick of the Day

Wednesday 14th November
13.00 -  Ideal World  -Tonic Studios (Pick of the Bunch ) Pick of the Day

Wednesday 14th November
15.00 -  Create and Craft  -Tonic Studios (Pick of the Bunch ) Pick of the Day

Wednesday 14th November
17.00 -  Create and Craft  -Tonic Studios (Pick of the Bunch ) Pick of the Day

Wednesday 14th November
19.00 -  Ideal World  -Tonic Studios (Pick of the Bunch ) Pick of the Day
2 hour last chance

Wednesday 14th November
20.00 -  Ideal World  -Tonic Studios (Pick of the Bunch ) Pick of the Day
2 hour last chance


Monday, 12 November 2012

Ideal World and Create and Craft Pick of the Day

Ideal World and Create and Craft  Pick of the Day


For all those who've asked to be kept updated - here are the details of my new dies and stamp sets which will be released on Ideal World and Create and Craft as Pick of the Day tomorrow evening at 9.00pm
There are 6 new dies and 3 coordinating stamps sets .
This is another 8" x 8" card and the frame looks great with the flowers embossed but on this one I've used the coordinating stamp set and added the coloured flowers to the frame. The ivy leaves up the side can be left in or taken out for a totally different look.This frame can also be used sideways..lots of different ways to go.

I do hope you'll like them and there will be lots of inspiration and sample cards made by Jodie and myself

Tuesday13th November
21.00  -Ideal World - Tonic Studios (Pick of the Bunch ) Pick of the Day

Tuesday13th November
23.00 -  Ideal World  - Tonic Studios (Pick of the Bunch ) Pick of the Day


Wednesday 14th November
08.00 -  Ideal World  - Tonic Studios (Pick of the Bunch ) Pick of the Day

Wednesday 14th November
10.00 -  Ideal World  - Tonic Studios (Pick of the Bunch ) Pick of the Day

Wednesday 14th November
12.00 - Create and Craft  - Tonic Studios (Pick of the Bunch ) Pick of the Day

Wednesday 14th November
13.00 -  Ideal World  -Tonic Studios (Pick of the Bunch ) Pick of the Day

Wednesday 14th November
15.00 -  Create and Craft  -Tonic Studios (Pick of the Bunch ) Pick of the Day

Wednesday 14th November
17.00 -  Create and Craft  -Tonic Studios (Pick of the Bunch ) Pick of the Day

Wednesday 14th November
19.00 -  Ideal World  -Tonic Studios (Pick of the Bunch ) Pick of the Day
2 hour last chance

Wednesday 14th November
20.00 -  Ideal World  -Tonic Studios (Pick of the Bunch ) Pick of the Day
2 hour last chance


Friday, 9 November 2012

Fuchsia and butterflies


It's really dull outside so I needed something to brighten things up a little - I think the bright pink and lime green do it!
This is a sample card which I made last week for a specific order to show several Tonic Studios products used together on a card. The main image is one of the Pick of the Bunch Fuchsias (my poor fuchsias are on their way to the shed to be overwintered and I'll miss them all outside my kitchen window) and I coloured it with Promarkers before matting it onto lime green paper. Then I matted that layer onto bright pink card with a Tonic Studios Vine border punched along the top and bottom. I also used the Vine Strip punch to add the matching strips across the card. I love the way the border and strip punches coordinate.
I have used the Butterfly border punch across the corners and then the corner wings to place the Butterflies Accent punch . A touch of glitter was all it really needed after that!

I'll be back soon with more previews of next week's new release on Create and Craft.

Thursday, 8 November 2012

Another little preview


I'm showing you another little preview of my new dies and stamps which will be shown on Create and Craft on Tuesday 13th or Wednesday 14th November - I'll post the date/time when it has been confirmed.
The possibilities and combinations are endless  - the dies can be used on their own in so many ways, the stamps can be used on their own in lots of ways and they can be used together in multiple combinations. There are many great combinations for the "dreaded male card" too! I do hope you like them..

Wednesday, 7 November 2012

Yellow rose


This is a large 8"x 8" card  - one of a set which I made at the beginning of the week. I actually never made this size of card before but had to make quite a few big samples for next week's launch of my new dies on Create and Craft (on Tuesday 13th or Wednesday 14th November - I'll post the date/time when it has been confirmed.) and got bitten by the bug and made a few more this size.
You've probably noticed by now that I always have gingham paper in my box and black and white is one of my favourites. This time I've teamed it up with beautiful music paper which I got at Paperworks when I was demoing on Saturday. The main image is one of my Pick of the Bunch Rose stamps and I've stamped some ivy from the Chrysanthemum set as well.
The gorgeous border behind the rose was made with the Tonic Studios Butterfly border punch and the border at the top and bottom of the card was punched with the Border System and edger punch 5.
The little black leaves are just a little sneak peak at one of the elements in one of my new die sets which you'll be able to see next week....there will be 6 lovely new dies with 3 matching stamp sets. I hope you like them!!


Tuesday, 6 November 2012

Look what's coming!!


I just couldn't wait until next week to show you the new stamps and dies which I've designed for Tonic Studios! I have put so much thought into making sure that there are multiple uses for each of the items as I just love to have something which has more than one use - I'm sure you do too..
(This is an 8" x 8" card so that should give you an idea of scale.)

These will be launched on Create and Craft next week as Pick of the Day on Tuesday 13th November.

Ok, all 6 dies and 3 matching stamp sets can be used on their own but you'll be happy to know that they can all be used together and in countless ways. I had to stop myself when I was making the demo boards -I could have gone on for ever..

This card incorporates the Lily Frame die (with matching stamps) trellis die, and the outline ivy from the Peony Frame die.

You're going to see lots of these in the near future as I have made so many...!


Thanks so much - demo day!


Good morning! I just want to say a BIG  "Thank You" to Heather from Paperworks, Dungannon for making me feel so welcome on Saturday. There is so much gorgeous stock in the shop I hardly knew where to start with my samples! It was great to meet so many happy crafters and get to know some of you whom I've "come across" in blogland but never met. It was lovely, too, to meet all the others whom I now know will be "quietly" reading these posts but have never got in touch before! I hope you all enjoyed it as much as I did and I'm looking forward to doing it again some time..

The card at the top is one of my "card-igans" but I've used the Tonic Studios Daisy Square Die as the collar this time instead of the border punch.

Now, I have a couple of things to answer..
Lena .... the pop up box for the card you asked about starts off with a piece of card measuring 11cm x 28cm. You then score it at 2.5cm, 7cm, 9.5cm, 18.5cm, 21cm and 25cm.
The slit for the doily and image is made at 14cm but you must leave 1cm at each side of the box to hold it together. If you go to THIS link on Splitcoaststampers you'll get the idea and you can use my measurements to fit the doily die.
If there is anything else you need to know just ask here or you could ask Heather to pass it on to me.

Geraldine... this is the Super Trimmer I was telling you about.

You can read the details HERE.
The legs at the side fold away when you don't need them and the little scorer and trimmer blade have pointers on the top, bottom and sides to show you where to start/stop you blade or scorer. Hope this helps.

Unfortunately the photos I took of my demo cards did not turn out well enough to use (that will teach me for rushing it!) so I'll just have to spend some time hand stitching another little square die bag!!

Thanks again for coming and it really was lovely to meet you all.