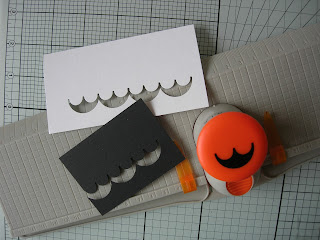
This is the kind of thing I love creating - give me a punch (not literally lol!) and let me look at it from different angles to see what I can do with it and I'm happy :)
The Border System is where I started out on my journey with Tonic Studios and I always have it to hand. The first card I made with it was a Cardigan card (see it HERE) and it's been in constant use ever since.
Last night I had some scraps of white card and black card sitting beside my punches and I was having another look through the array of punches for the system when I had a "light bulb" moment.
I grabbed my Double Scallop punch and made a little keyboard..
The rosebud to the left of the keyboard is one of the Rose stamps from the Pick of the Bunch collection,also by Tonic Studios
The rosebud to the left of the keyboard is one of the Rose stamps from the Pick of the Bunch collection,also by Tonic Studios
I have used 3D foam squares from Scrapbook Adhesives by 3L to mount the black keys on top of the white ones to give dimension and I've also used the 3D thin white foam squares from Scrapbook Adhesives by 3L to mount the white keys onto the black rectangle.
It's so easy you probably don't need instructions, but here they are just in case -
1. Using the Tonic Studios Border System and Medium Double Scallop punch, punch 4 times on white card and 3 times on black card.
2. Using the Tonic Studios Super Trimmer score between each "key"
3. Cut off one "key" to leave 7 and then draw a line with a fine liner pen between each key.
4. Cut off 5 of the black keys carefully making sure they are perfectly rounded with no "bits" at the sides.
Now you've got the keys...add the black ones on top of the white ones as shown in the photo - mounting on 3D foam squares.


This is brilliant Ruth, I love it.
ReplyDeleteSue x
Wow, this is fantastic Ruth. You are so inspirational. Thank you!
ReplyDeletePam
So clever and so effective, love it xx
ReplyDeleteWow, this is fantastic Ruth. You are so inspirational. Thank you!
ReplyDeletePam
The things you come up with using your punches Ruth, never fail to amaze me. This is so very inspirational beautiful work.
ReplyDeleteB x
Brilliant! Can I come and live in your head for a while, I would love to come up with so many original ideas!
ReplyDeletefab tutorial ruth,x
ReplyDeleteYou are way too clever Ruth....this is so wonderful.
ReplyDeleteSuper idea......so effective.Thanks for sharing.
ReplyDeleteKim xx crafty-sisters Docrafts.
WOW! how fabulous. Such a clever design. I love the musical paper too.
ReplyDeletehugs Sue
This is such a great idea, it looks stuning x
ReplyDeleteWow this is fabulous, love the musical paper. Marlene
ReplyDeleteWOW! Absolutely fabulous Ruth, such a clever design, love it.
ReplyDeleteenjoy the weekend.
Wendy xx
this is awesome. love it. going to try for sure. thanx for tutorial dear.
ReplyDeleteThis is super and so clever of you, now why didn't you come up with this idea when I was making the grand piano for my son's birthday card. Would have been so easy. Chris Lee
ReplyDeleteoh wow this is fabulous ruth.really stunning and unique design :D
ReplyDeletexx coops xx
WOW! You are so clever Ruth, this is absolutely brilliant, such a striking card. Thanks for the tutorial as well. Michelle x
ReplyDeleteFantastic card, you are a very clever crafter with so much talent. Thanks for sharing, wish I had a fraction of your insperation.
ReplyDeleteClaire
This is lovely Ruth - it would be ideal for someone who has just passed a piano exam!
ReplyDeleteBernice
Wow this is brilliant!
ReplyDeleteGreat way of using Tonic punches!!
Hugs Anita
Ingenious, I love it. Elaine
ReplyDelete