

Good morning!We've been having fantastic weather here in Northern Ireland for most of the last week - real exam weather!!
On Saturday I learnt a lesson I really should have learnt years ago....never wear a necklace while sunbathing!!
We went to the beach at Portrush on the North coast with about 80 others (lots of kids) on a Sunday School trip.I never usually lie in the sun , in fact I never usually sit still for very long, but, as we say in these parts, the "craic" was good and I just lay down and enjoyed the chat while the kids played on the sand. A few hours later I got up with burnt neck and shoulders and a lovely white "necklace"!! And, oh yes....I did plaster on the suncream.
I was having a little play with the new Victorian Border punch by Tonic Studios a couple of weeks ago and came up with some different things to do with it. This is the first one and I've made a card and little matching bag to show it off. The image is "Two Roses" - one of my digi images from A Passion for Stamps
I've chosen bold black stripes with contrasting Antique pink. The little flowers on the strip were made using Tonic Studios Petal Pairs and Petal Pairs Petites
Here's how I made the little strip.
(THIS WORKS WITH SOME OF THE OTHER PUNCHES IN THE RANGE TOO.THE STRIP WIDTH NEEDS TO BE SLIGHTLY DIFFERENT - I'LL BE SHOWING SOME MORE IN A DAY OR TWO)
(THIS WORKS WITH SOME OF THE OTHER PUNCHES IN THE RANGE TOO.THE STRIP WIDTH NEEDS TO BE SLIGHTLY DIFFERENT - I'LL BE SHOWING SOME MORE IN A DAY OR TWO)
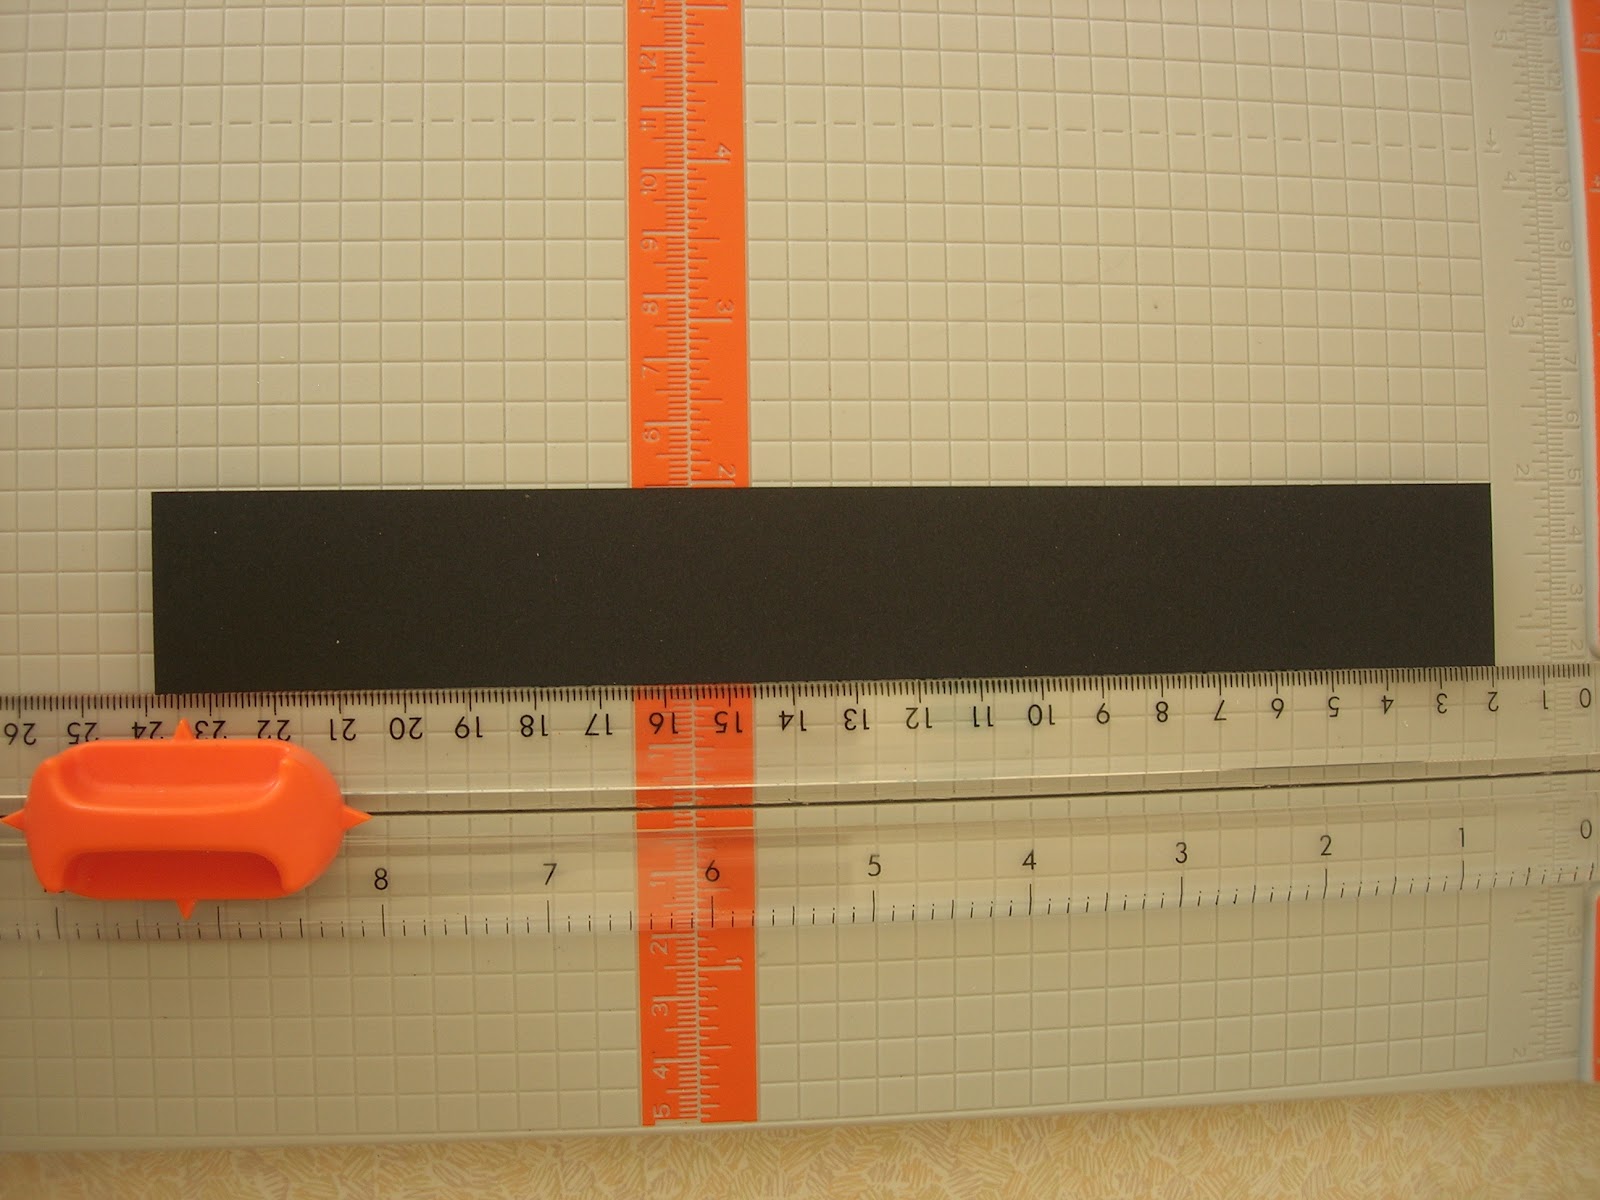
1. Cut a strip of black card 3cm wide and as long as you need for your card.

2. Punch along one side with the Tonic Studios Victorian Border punch

3. Turn the strip over and line up as shown above. I've made a little mark directly above the dashed line on the punch so you can see it above the card.


4. Now line the punch up as normal and carry on punching along the card to the end.

5. The finished strip.

Fabulous card Ruth your so clever with those punches and the image is delightful. Caroline xxx
ReplyDeleteThis is lovely Ruth, thank you for the tutorial. I have a couple of tonic punches so might have to give it a go.......
ReplyDeletePam
I must admit,I envy you for those punches!Your cards are always adorned with beautiful paper laces and the result is fabulous!
ReplyDeletehugs,
The zig-zag lace effect is genuis!
ReplyDeletewow another great tutorial. i need this punch! i have got a couple now and they are soooo easy to use and cut thicker card than most punches. im talking myself into buying more arent i? lol
ReplyDeletelove your blog ruth.
suzanne x
Oh Ruth, I do so love this one, the colours are great and with the striped DP and border it has a real Parisian Chic feel to it.
ReplyDeleteB x
ooo how very elegant ... love your card and love the border lovely and you make it look so easy ... thank you for sharing it with us ... ooo and how very clever of you to have thought of a new way of wearing a necklace without actually wearing one lol ... happy crafting and love sandy xx
ReplyDeleteOh Ruth these are so beautiful and elegant looking. I love how youve used the border punch. Isn't the weather amazing? Im in heaven. Though I see a lot of people are running about with a "Northern Ireland Tan" as I call it. Because as you know, sun and heat here is very rare, when it does come out people go into panic mode to get some sun. They either don't put any or a high enough factor on or sit out too long, hence the "Northern Ireland Tan"......loads of people running about looking lobster pink, lol!! I was wearing factor 30 and still managed to get my hands and feet burnt! Lee z
ReplyDeleteStunning card and bag, the colours are gorgeous. I love the way you have used the punch and thanks for a fab tutorial.
ReplyDeleteAll the best
Sue
Oh this is is a great idea for the punch - I never would have thought of doing that with it. You certainly chose the right week for your Sunday School trip - hope your sunburn gets better soon!
ReplyDeleteBernice
What a gorgeous punch, I could have done with that one on my latest Joanna Sheen Cameo card I made it would have gone perfect with it. Absolutely love your card Ruth, it's really Elegant & Classy. hugs Teresa xx
ReplyDeleteI knew i shouldn't have looked!!! This is lovely Of course I'll have to get that punch NOW!
ReplyDeleteYour card and gift bag are amazing x
ReplyDeleteThank you for taking the time to do the tutorial x
both so stunning ruth.i love the sylish colours and your work wonders with your punches :D
ReplyDeletexx coops xx
Beautiful card with a lovely image and great flowers. Thanks for joining in the Alphabet challenge this week.
ReplyDeletePat xx
Gorgeous card! I love the colors and your beautiful border!! Thanks for joining us at Alphabet Challenge Blog!
ReplyDeleteTammy x
A fabulous card Ruth. I would never have thought to use the punch in that way - tfs with us. Pat
ReplyDeletebeautiful image, love rose images as they are so wonderful to colour. lovely card and gift bag, love your cards and want your punches! hope your skin is okay now hugs Karen x
ReplyDeleteStunning, stunning, stunning! Such clever punching and I love the image xx
ReplyDeleteWhat a fabulous card, love the colours and the image is gorgeous. Thanks for the tutorials. Michelle x
ReplyDelete