I filmed this while I was actually making them a couple of months ago so if you haven't already got a copy this may whet your appetite and if your is ordered, you can watch the video as well as read the instructions! The shaker card instructions are in the mag....the rest can only be seen in my video :)
Thanks so much to everyone who has taken the time to watch my videos and leave a comment. I really do appreciate it :)
Friday, 29 July 2022
Issue 4 of the Official Tonic Magazine is now available!!
The new launches will be added to the website at noon and I'll be posting lots and lots of photos here and a video on YT at 1.00pm! (BST) I've made another video while I was construction my commission pieces a few months ago and will post it when your magazines start to arrive with you
Don't forget to check out all the special deals which are currently available along with the new launches
Welcome to the “Memories to Cherish”
My Memory Book die set. This collection contains 42 dies spread over 2 packed
sets!! It can be used to create 5 different sizes of books, including Tonic’s biggest
book to date!!
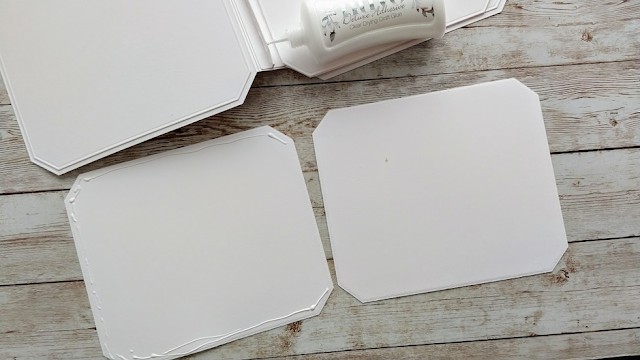
1.Use the 17cm x 13.75cm die
to cut out the front and back covers of the book, placing the front cutting
edge at the edge of the card. Cut out a spine.
2. Cut the spine to 10.5cm long and
burnish the score lines in as shown. Adhere both the mountain fold together
with hi tack tape or wet glue.
3. The finished spine.
4. Cut the ends of the covers from
the A4 card leaving 3cm on each. Score and fold as shown and glue together to
form a cover.
NB If you want more pages, you can
cut these covers with extra card on the open edge and add another spine beside
the first one.
5. Glue the spine into the inside of
the covers.
6. Die cut 6 of the slightly smaller
layering dies to create pages. Glue one to the inside front cover and one to
the inside back cover. Create a page by gluing 2 die cuts together leaving one
short side free from glue. Add glue down both sides of one of the page
connectors in the spine and position the double -sided page over it. Repeat
with the other page.
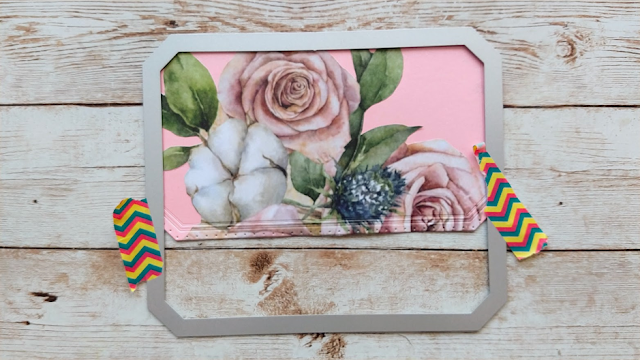
7. Die cut pink mats and patterned
paper layers for the covers and glue in place. Add a 2.5cm x 10cm strip of pink
card with a 2cm x 9.5cm layer of patterned paper on top to the spine. Die cut
the sentiment from white card and glue onto a pink die cut backing plate. Glue
to the bottom right of the book front.
Page 1.
Using the dies shown, adhere a pink
mat. Then attach a 2.5cm x 10.5cm strip of patterned paper to a 3cm x 11cm
strip of pink card and attach this down the centre of the page with hi tack
tape at the top and bottom. Create tags with the smaller dies on the left.
Page 2.
Using the dies shown, adhere a
patterned paper mat.
Glue patterned paper onto white card
and die cut with the die shown. Then move the die up and die cut over the top
line again to create a smaller shape. You will feel the holes in the die to
line this up when you place the die over the top for the second cut.
Attach the sides and bottom to the
page with glue/hi tack tape and make a tag with the bottom two dies in the
photo.
Page 3.
Using the dies shown cut and glue a
patterned paper mat onto the page.
Die cut the small pink shape with the
slits and thread a 7mm x 10.5cm strip of white card through the slits before
gluing the top and bottom of the strip to the page.
Create a tag and slip in behind the
strip.
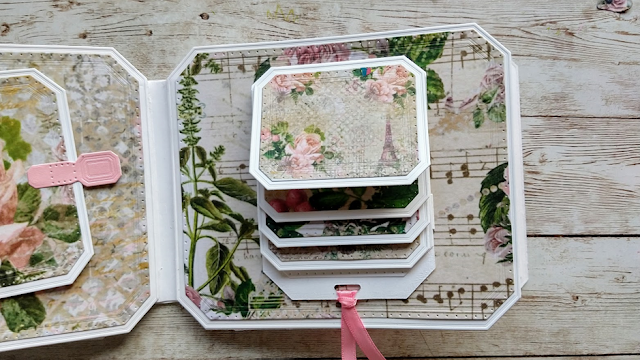
Page 4.
Using the dies shown die cut a white
waterfall piece and strip. Burnish all the score lines well. Thread the strip
through the slits in the main piece. Die cut 4 white shapes and 4 patterned
paper panels. Glue together.
Fold the waterfall piece in two where
the notches are at the sides. Glue the tabs and attach this to the centre of the
page.
Glue the tops of the patterned pieces
below each of the burnished score lines and add a ribbon loop at the bottom.
Page 5.
Using the dies shown on the left,
firstly cover the page with a patterned paper mat. Then turn the large die 90 degrees
and cut a white pocket (cut in half) Use the smaller die shown to cover with
patterned paper.
Use the dies at the top of the photo
to create a tag, cutting off the patterned paper to keep it symmetrical.
Page 6
Using the dies shown, add a pink
panel to the page.
Leave a tab of card on one of the
smaller white die cuts and cut it off the other.
Add glue to the inside of the tab and
glue to the back of the second panel to create a small card.
Add a patterned paper panel to the
front of the card.
Using the 2 dies on the right, make a little
fold over tab. Score down the side to create the tab.
Glue the tab of the smaller panel in
behind the “card” and glue to the page.
Glue a patterned paper circle to a
white card circle and attach to the large “card” with a 3D foam pad on one
side. It will act as a closure for the smaller flap.
Don’t forget that you can add as many
pages and photos tags etc as you like.
When you’re using a large 12 x 12
paper pad, remember to be creative and fussy cut lots of elements from the
paper to glue onto your tags.
Hello :) The Birthday Week Celebrations at Tonic Studios have begun!!
This fabulous die set contains 44 dies which you can use to create a beautiful centre piece/ treat dispenser! It will look amazing on your table!
Keep scrolling down for LOTS of photos and links to the products I used but
you can see how I made both of these in my video here
In this video I show you all the steps in cutting and assembling the gift box and the carousel. I have made them as 2 separate projects but you can also glue them together and add the roof on top.
There are so many possibilities with this set and the finished result will look stunning in Christmas colours or even pastel colours for a baby shower.
I have used the following products (affiliate links)
Big Top Carousel die set
UK - https://shrsl.com/3mm0h USA - https://shrsl.com/3mm0k
I've been amazed at how many cards, scheduled posts and videos I have to work my way through. I must have been busy over the last few months as I have enough to keep me going for quite a while.
I'll be back with more that "I made earlier" as it's Tonic's BIRTHDAY WEEK!!
My inspo samples and videos have been lined up and ready to post for a couple of months!!
It's time for another challenge at Allsorts! The theme this time is "Summer" Of course, summer means different things to different people but you know it usually means "flowers" to me" :)
I am one of the sponsors of the latest challenge so you could win 3 of my digi images from